A couple of years ago I was wiring up an electric fuel pump in the boot of my 02, and I was trying to find a neat way of running fused power from the fuse box back to the boot without splicing or destroying the original loom. Someone kindly pointed out to me that my car in fact already had an unused terminal, hidden in plain sight, that was intended by BMW for a fuel pump to be connected to it. I know BMW intended this, because shortly afterwards I found a supplement to the factory workshop manual that described this exact connection method for dealer-fitted electric fuel pumps. It got me thinking – what else was hidden below the fraying cloth tape of my 50-year old wiring loom?

Time to drop in the new motor, with the repaired & upgraded loom in place.
The answer came earlier than I expected. After years of accumulating niggling mechanical issues with my 02 (blocked radiator, seized heater tap, leaking brake boosters, worn gearbox synchros, sloppy tail shaft uni joints etc) I finally made the call to pull the engine out and deal with a few issues, starting with the rusty floorpan below the pedal box. Of course, that’s how it started, but not how it ended. As is the way with old tired cars, you start stripping away parts and paint, and you uncover more problems as you go. To get the engine out, I had to drop the tail shaft. This was the day I learned that both universal joints in the tail shaft were so worn that I was sure they were only held together with hopes and dreams. I also learned that the gearbox output flange nut was loose, the shifter support plate bolts were loose, and that when you tipped the radiator upside down it sounded like you were tipping ball bearings into a tin can. I wasn’t upset, not at all, I was glad I was finding issues that needed attention. The more I looked, the more I found. Eventually, I ran out of mechanicals to pull out of the car – all of the suspension, brakes, dash, heater box, steering column, wiring looms were on my workshop floor, and I had no more unknowns, and a big list of things that needed fixing.

Below the wiper relay, near the bonnet release, you’ll find a terminal connected to a green/white wire. Connect an electric fuel pump to this terminal.
For years I’d toyed with the idea of ditching the stock engine fan and fitting a 12″ thermo fan in front of the radiator. I’d had no immediate need to do it, but it was always at the back of my mind. I’d also been waiting for some spare time to upgrade the stock wiring loom to include relays for the headlights just like the later cars had from factory, and perhaps fit one or two gauges to a custom centre console. Well, if there was ever a time to make adjustments to my wiring loom, now was the time to do it. The old cloth tape was swiftly removed from the loom, and the wiring carefully cleaned up with alcohol. Armed with a wiring diagram and a soldering iron, I wrapped my head around BMW’s nomenclature and colour codes. The wiring in a pre-’73 car is much simpler than the later cars, particularly with the driver controls, which made things easier. With the tape removed, it didn’t take much to neatly add a pair of Bosch headlight relays next to the horn relay, and then wire it back through the fuse box so that the headlights were fused, closely matching the wiring of a post-’73 car.

Heater blower / heated rear windscreen switch connector, showing the green/blue & black/red wires. Also visible here is the red/yellow wire for the cigarette lighter, which is fused and receives constant power.
Thermo fan wiring was a little more tricky. I didn’t want fancy electronic variable adjustable controllers with LCD screens and probes in radiator hoses. The brief was to fit a thermo fan that you could only tell was there if you went looking for it, no visible wiring, and it had to be fused, controlled by a fixed temperature sensor, running through a relay mounted next to my new headlight relays. Although it’s probably not to the liking of the purists, power for the thermo fan comes from the heated rear windscreen circuit, given my car doesn’t have a heated screen. It’s a beefy 16A fuse, which is plenty for my ~9A Davies Craig fan. My car has a 2-port water divider that had a blanking plug in the second port, so I used the spare M14x1.5mm port for a Tridon fixed temperature switch (part no. TFS106). The thermo switch controls the relay, and turns the fan on at 95ºC and turns it off when the water cools down to 90ºC. I hope I never have to use it, but I found a neat solution for an override switch for the fan in case for some reason the water temp sensor fails. I admit I didn’t think of this until I’d already wired in a separate override switch, but it occurred to me the heater blower fan knob also controls the heated rear windscreen. Turn the knob clockwise to turn the heater fan on, and pull it out towards you to turn on the heated rear screen. See where I’m going with this yet? Yep, you guessed it, pull the green/blue and the black/red wires off the back of the blower fan switch, connect up two wires that feed from/to the thermo fan relay, and you’ve got yourself an override switch that even has a picture of a fan on it, all while retaining original heater fan operation. Obviously, this only works if you don’t have a heated rear screen, which in this case suited me just fine.

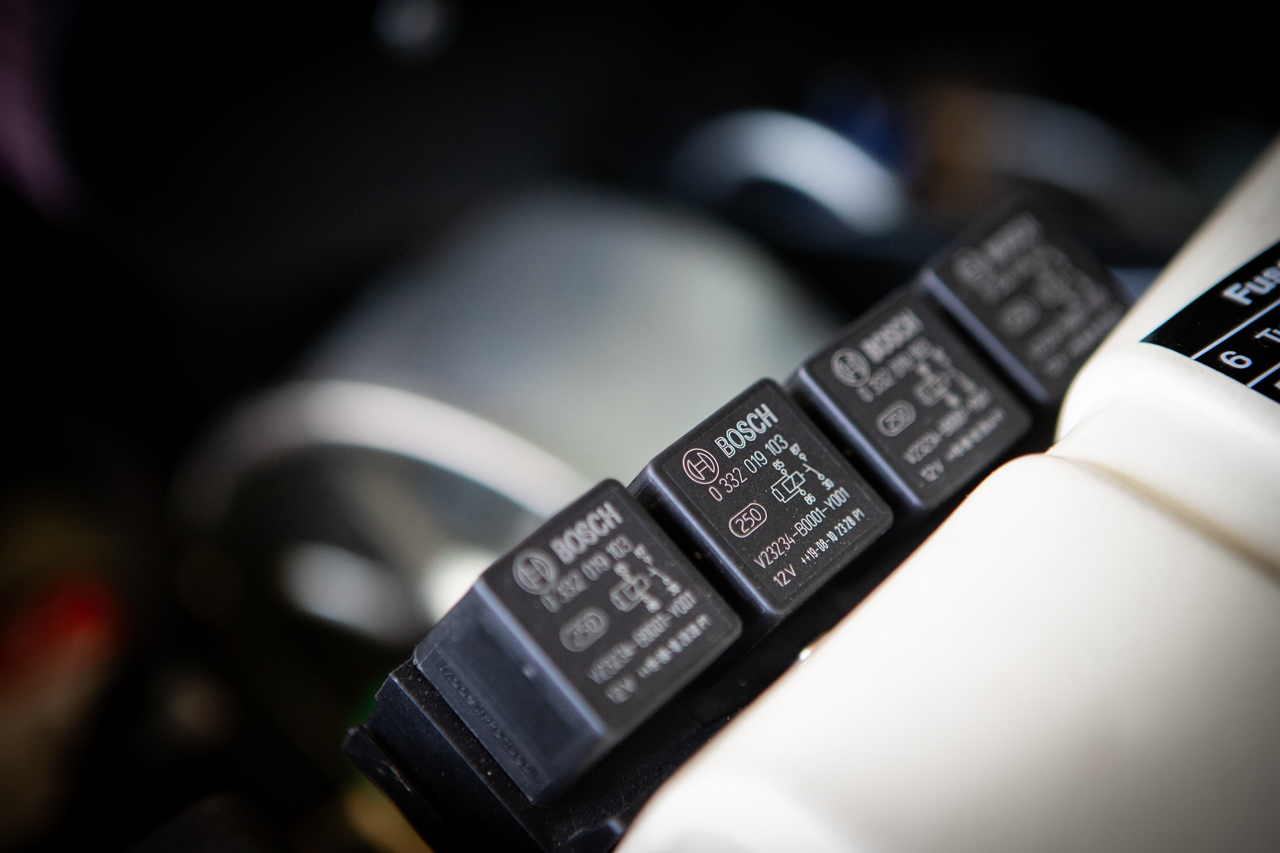
Bosch relays for horn, low beams, high beams & thermo fan.
Repairing and upgrading wiring looms can either be incredibly frustrating or incredibly cathartic, depending on how well-prepared you are. If you plan on doing your own loom work, make sure you print and study the wiring diagram for your car, buy yourself a test light for probing terminals, and take your time! Here’s a list of unused terminals you’re likely to find hidden beneath cloth tape:
- Green/white terminal under wiper relay unit, near the bonnet release. Factory connector for electric fuel pump.
- Grey/blue terminal used on automatic cars for the selector gate lighting. Can be found right near the above fuel pump terminal. This is connected to the dimmer switch for your dash gauge illumination. Connect your aftermarket centre console gauges to this terminal for dimmable lighting.
- Black terminal on passenger side engine bay, near brake boosters. This is part of the starter relay circuit, used to trigger cold start timer on Tii cars. Whenever the starter motor is turning, this terminal is live. Can be used for relays that need a trigger during starting, like a Bosch tachometric relay, as used on the Bosch LE EFI system. Tachometric relays are a safety device that will cut power to a fuel pump and EFI systems if the engine stops, the idea being that if you were to have a crash and sever a fuel line, the engine will stop and you won’t keep pumping fuel out onto the road.
- White terminal on passenger side engine bay, near radiator. This is part of the high beam circuit. Can be used for extra lights you may want to turn on with high beams. You could also remove the green blanking button from the ashtray and fit an actual button and wire it up so that you could have high beams on their own, or high beams + driving lights, all using factory parts.
- Green/red terminal in boot above wheel arch, used for rear fog lights.
- Violet/black terminal attached to the rear of the hazard switch plug is the factory terminal for a radio. This terminal is live with accessories and ignition. May also be violet/white on some cars.
- Red/yellow terminal on back of cigarette lighter can be piggybacked and provides constant power for anything that needs a small amount of constant power, like an aftermarket clock, or the memory setting for an aftermarket head unit.
- Green/blue & black/red wires on the back of the heater blower switch are used for the heated rear windscreen. If you don’t have a heated windscreen, you can use the pull switch to control something else, in my case, an override switch for the thermo fan.
- Some, but not all dashboards, have a cutout to suit the Tii clock. It’s not fully cut through the foam, but the location is easily marked and cut out, should you want to fit a Tii clock.
There’s probably a few more hidden gems in there. This list specifically applies to pre-’73 12V 12-fuse cars, but you’ll find a lot of these connection points on other cars too. Found anything else? Let us know below!
Happy ’02ing everyone!
Leave a Reply